How Payment Gateways Work: Complete Guide with Razorpay Integration in Node.js
1. What is a Payment Gateway?
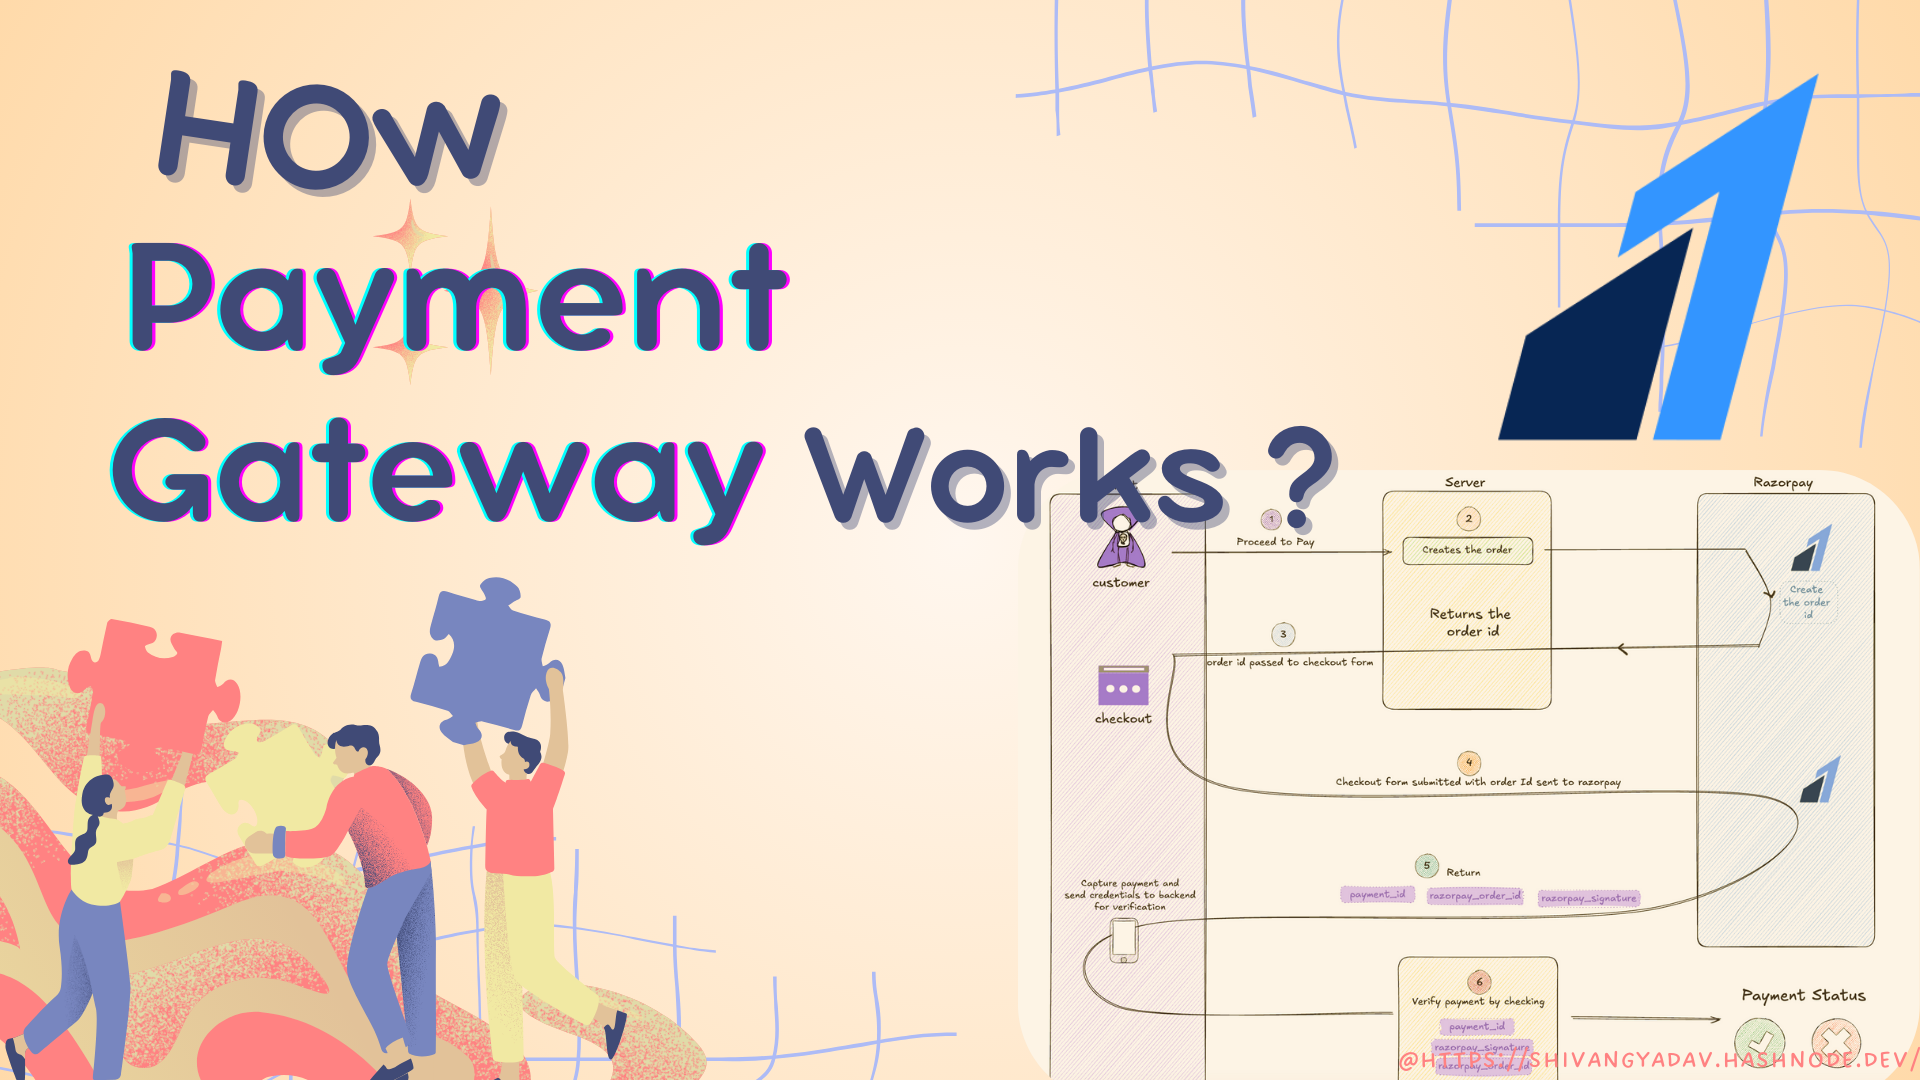
A payment gateway is a service that facilitates online payments between buyers and sellers. It acts as a bridge between the customer, the merchant, and the bank. Payment gateways securely transmit payment information for credit cards, debit cards, UPI, and other payment methods.
2. Components of a Payment Gateway
Merchant: The business or individual selling a product or service.
Customer: The buyer who makes the payment.
Acquiring Bank: The merchant's bank that receives the payment.
Issuing Bank: The customer’s bank that issues the credit or debit card.
Payment Processor: Handles the transaction processing and communicates between the acquiring bank and issuing bank.
Payment Gateway: The service that authorizes and handles the secure transmission of payment information.
3. How Payment Gateway Works: Transaction Flow
Here’s the step-by-step flow of how a payment gateway processes payments:
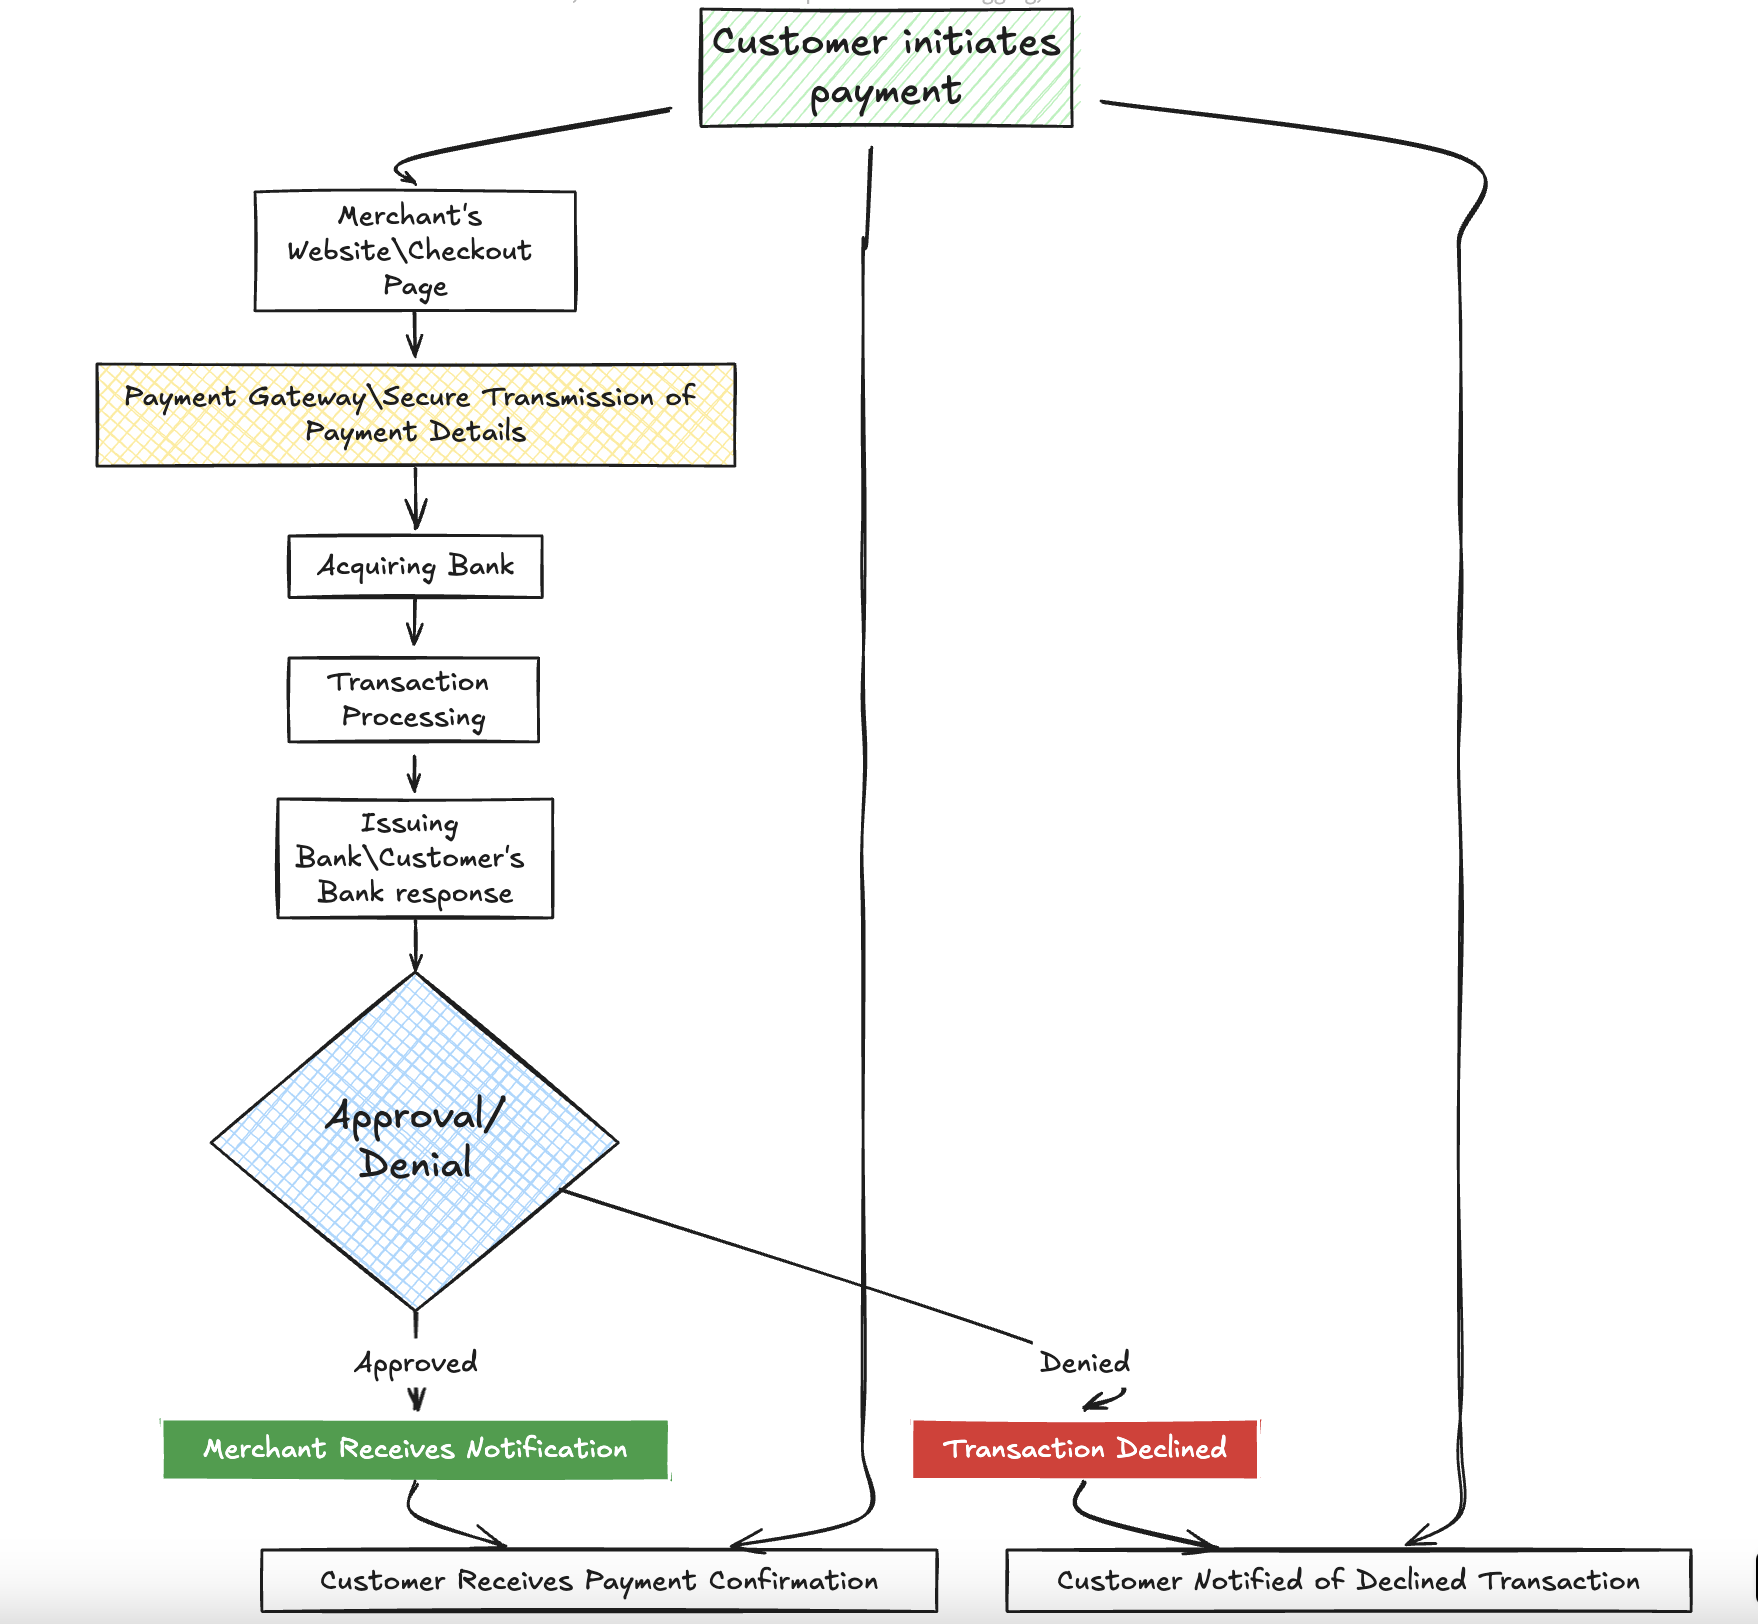
Step 1: Customer Initiates Payment
The customer selects products/services on a merchant’s website and proceeds to checkout.
At the checkout, the customer chooses a payment method (e.g., credit/debit card, UPI).
Step 2: Payment Gateway Authorization
- Once the customer submits the payment details, the payment gateway securely encrypts and transmits this information to the acquiring bank.
Step 3: Acquirer Requests Authorization
- The acquiring bank sends the payment request to the respective card network (e.g., Visa, MasterCard) or UPI network.
Step 4: Issuing Bank Validates
- The issuing bank (customer’s bank) checks if the customer has sufficient funds or credit limit and performs fraud checks.
Step 5: Approval or Denial
Based on the validation, the issuing bank approves or denies the transaction.
The decision is communicated back to the payment gateway.
Step 6: Payment Confirmation
The payment gateway informs the merchant if the payment was successful or failed.
If successful, the merchant processes the order.
Step 7: Settlement
- The acquiring bank collects the payment from the issuing bank and settles the amount with the merchant’s bank account, usually within a few business days.
4. Payment Gateway Security
SSL Encryption: Ensures secure data transmission between customers and payment gateways.
PCI-DSS Compliance: Industry standard for securely handling credit card information stated in Payment Card Industry Data Security Standard.
Tokenization: Sensitive data is replaced by unique identification symbols (tokens) that are exchanged during the payment.
3D Secure: 3D Secure (3-domain structure), an additional security layer that addresses issues of fraud in online debit or credit card transactions.
5. Introduction to Razorpay Payment Gateway
Razorpay is a popular payment gateway that supports multiple payment methods, including credit/debit cards, UPI, net banking, and wallets. Razorpay simplifies the process for merchants by providing an easy-to-integrate API for accepting payments.
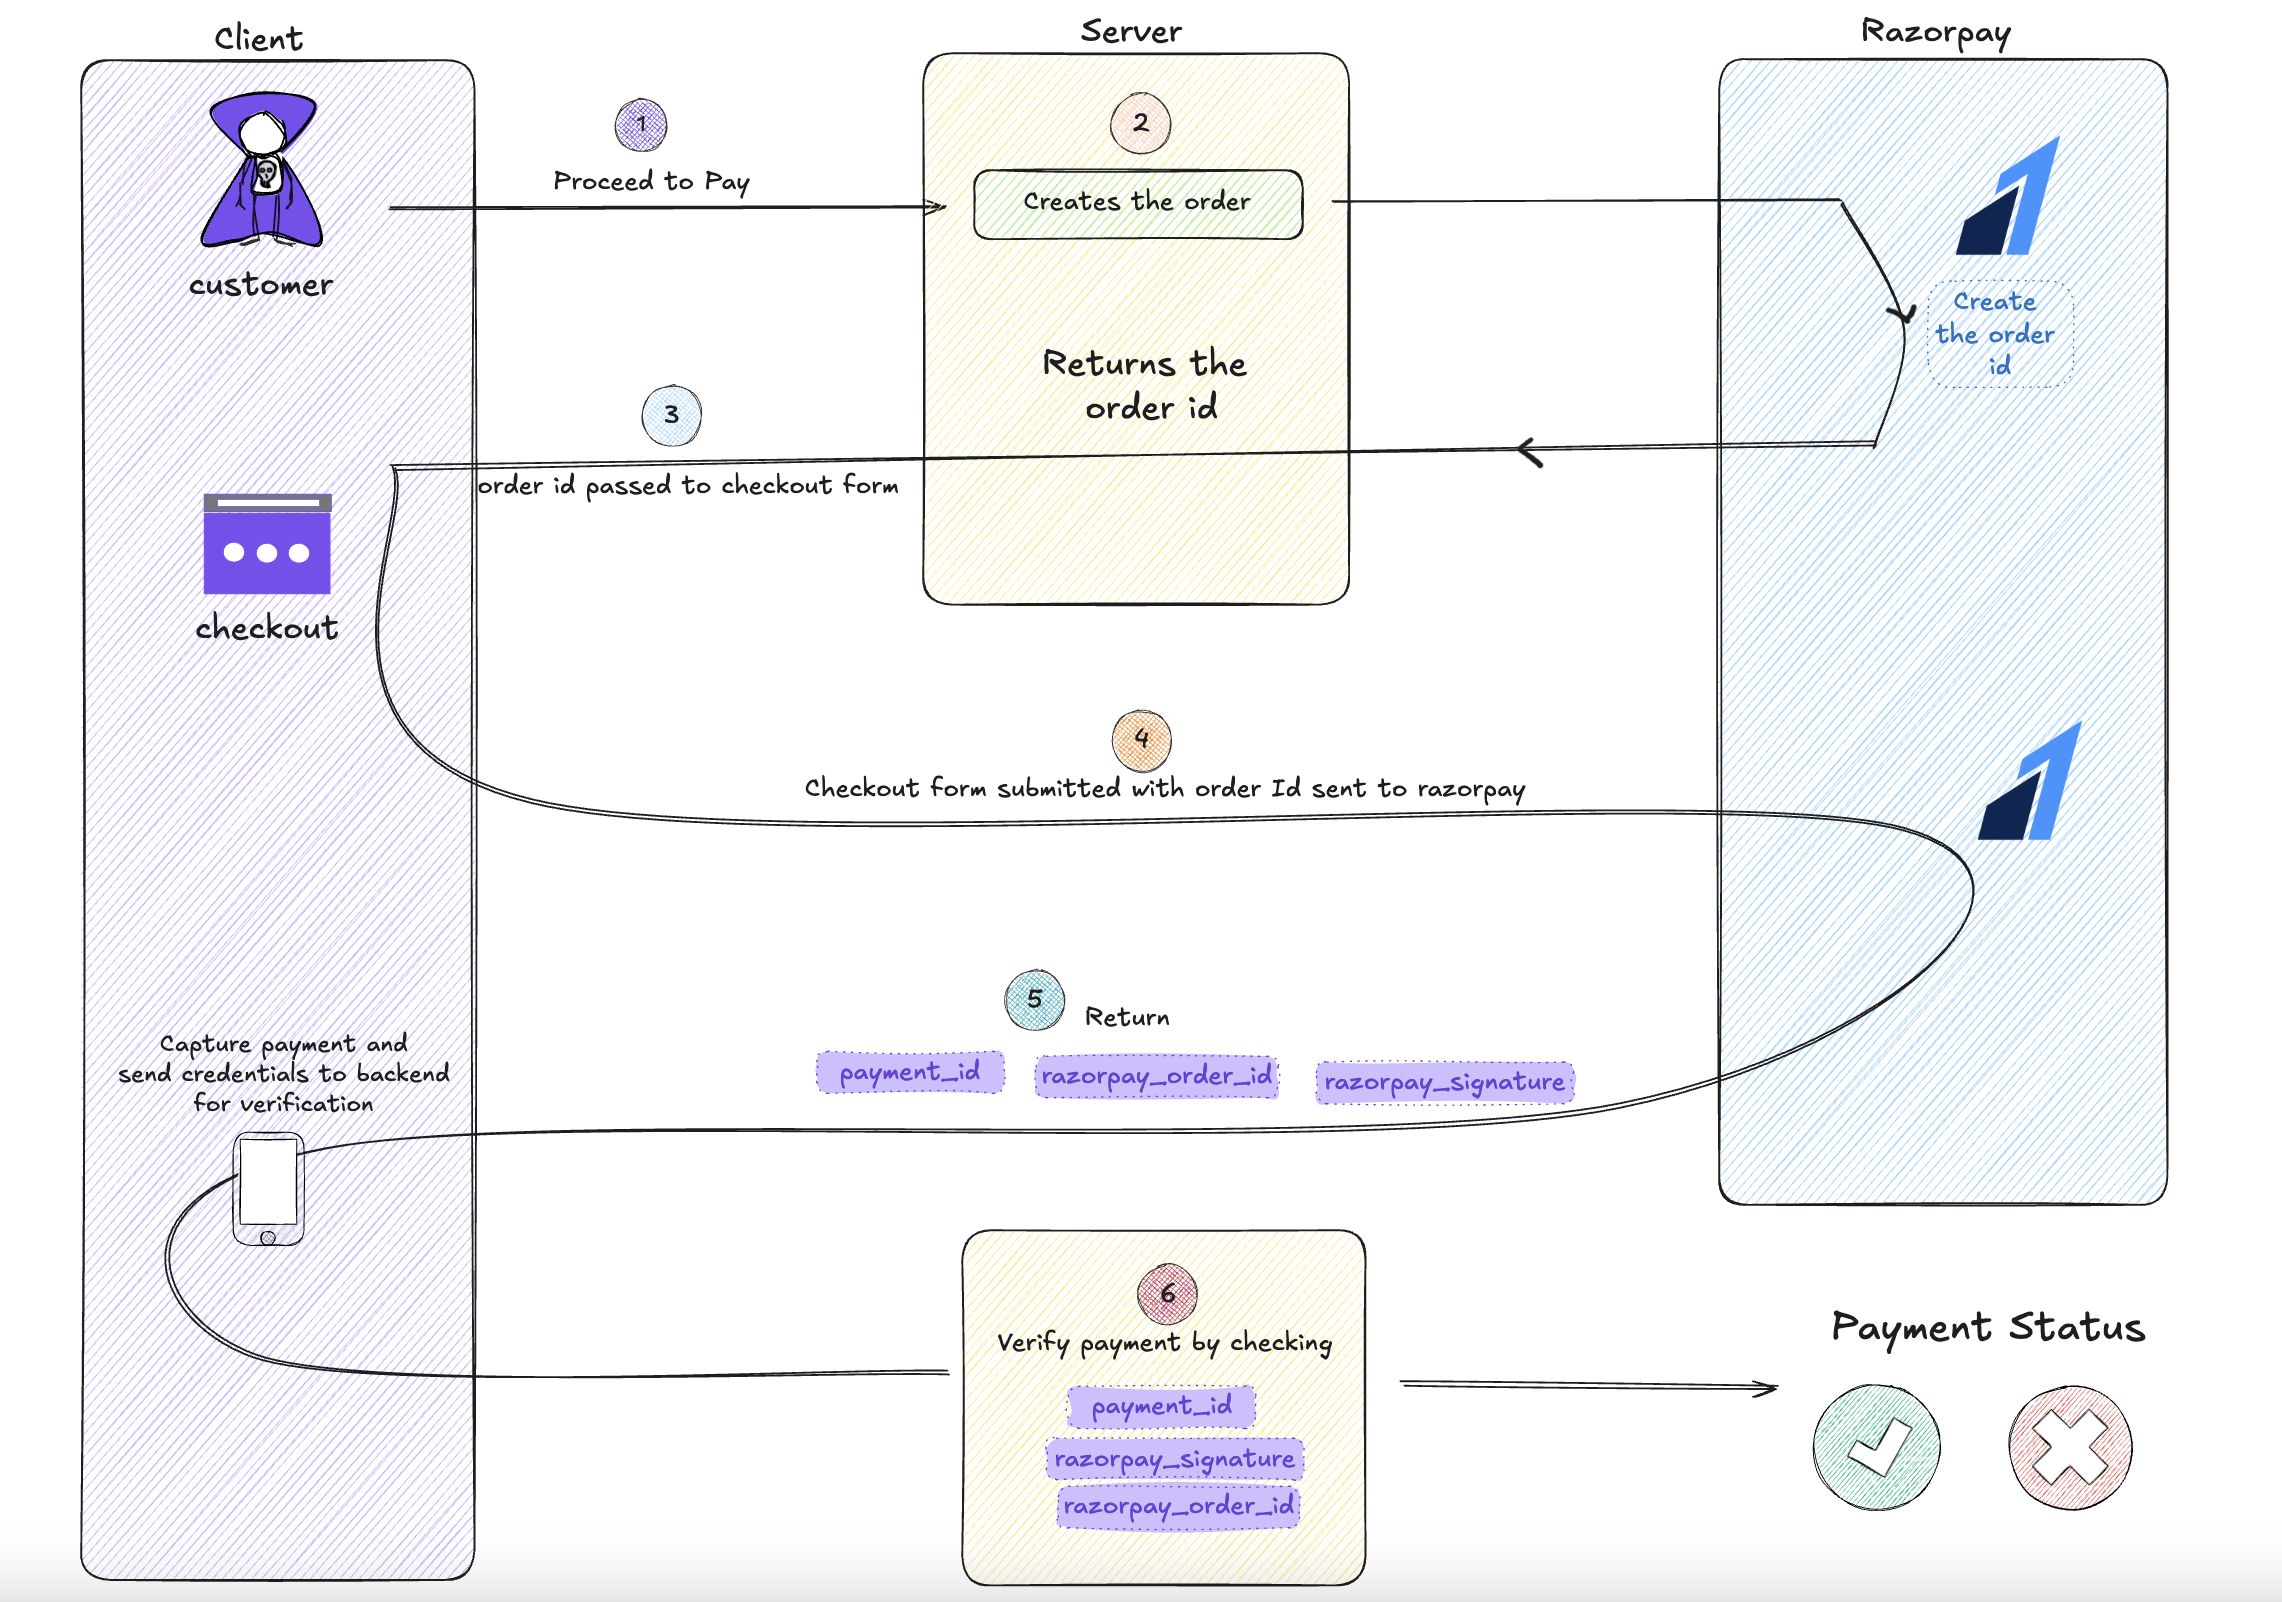
6. Integrating Razorpay in Node.js Application
Let’s now go step by step on how to integrate Razorpay into a Node.js project.
Step 1: Install Required Packages
You need to install the Razorpay Node.js SDK and any other required dependencies.
npm install razorpay express body-parser
Step 2: Set up Razorpay Account
Sign up on Razorpay.
Create an API key in the Razorpay dashboard. You will get a
key_idandkey_secret, which will be used to authenticate API requests.
Step 3: Initialize Razorpay
In your Node.js application, you need to initialize Razorpay using the SDK. Create a file called payment.js to manage your payment logic.
const Razorpay = require("razorpay");

const razorpayInstance = new Razorpay({
  key_id: process.env.RAZORPAY_KEY_ID, // Replace with your Razorpay key_id
  key_secret: process.env.RAZORPAY_KEY_SECRET, // Replace with your Razorpay key_secret
});
Step 4: Create Payment Order API
You need to create an endpoint to generate a payment order before sending it to the client for payment.
app.post("/api/create-order", async (req, res) => {
  const { amount, currency, receipt } = req.body;

  try {
    const options = {
      amount: amount * 100, // amount in the smallest currency unit (e.g., paise for INR)
      currency,
      receipt,
    };

    const order = await razorpayInstance.orders.create(options);
    res.status(200).json(order);
  } catch (error) {
    res.status(500).json({ error: error.message });
  }
});
Step 5: Frontend Integration
On the client side, you need to display the Razorpay payment form. Use the Razorpay checkout script:
<script src="https://checkout.razorpay.com/v1/checkout.js"></script>
Then, initialize Razorpay when the user clicks on the "Pay Now" button.
const options = {
  key: "YOUR_RAZORPAY_KEY_ID", // Enter the Key ID generated from Razorpay Dashboard
  amount: order.amount, // Amount in paise
  currency: order.currency,
  name: "Merchant Name",
  description: "Test Transaction",
  order_id: order.id, // Order ID created in the backend
  callback_url: "/api/verify-payment", // Usually for verifying subscription
  prefill: {
    name: "Customer Name",
    email: "customer@example.com",
    contact: "9999999999",
  },
};
const rzp = new Razorpay(options);
rzp.open();
Step 6: Handle Payment Success
Once the payment is successful, Razorpay sends back a payment ID and order ID. You can use this data to verify the payment on the server side.
app.post("/api/verify-payment", (req, res) => {
  const { razorpay_order_id, razorpay_payment_id, razorpay_signature } = req.body;

  const body = razorpay_order_id + "|" + razorpay_payment_id;
  const crypto = require("crypto");
  const expectedSignature = crypto
    .createHmac("sha256", process.env.RAZORPAY_KEY_SECRET)
    .update(body.toString())
    .digest("hex");

  if (expectedSignature === razorpay_signature) {
    res.send({ success: true });
  } else {
    res.send({ success: false });
  }
});
7. Conclusion
A payment gateway ensures that online transactions are conducted securely and efficiently. In this blog, we discussed how payment gateways work, and we provided a detailed guide on integrating Razorpay with Node.js. You can now enable payments in your Node.js app using Razorpay, following this step-by-step guide.